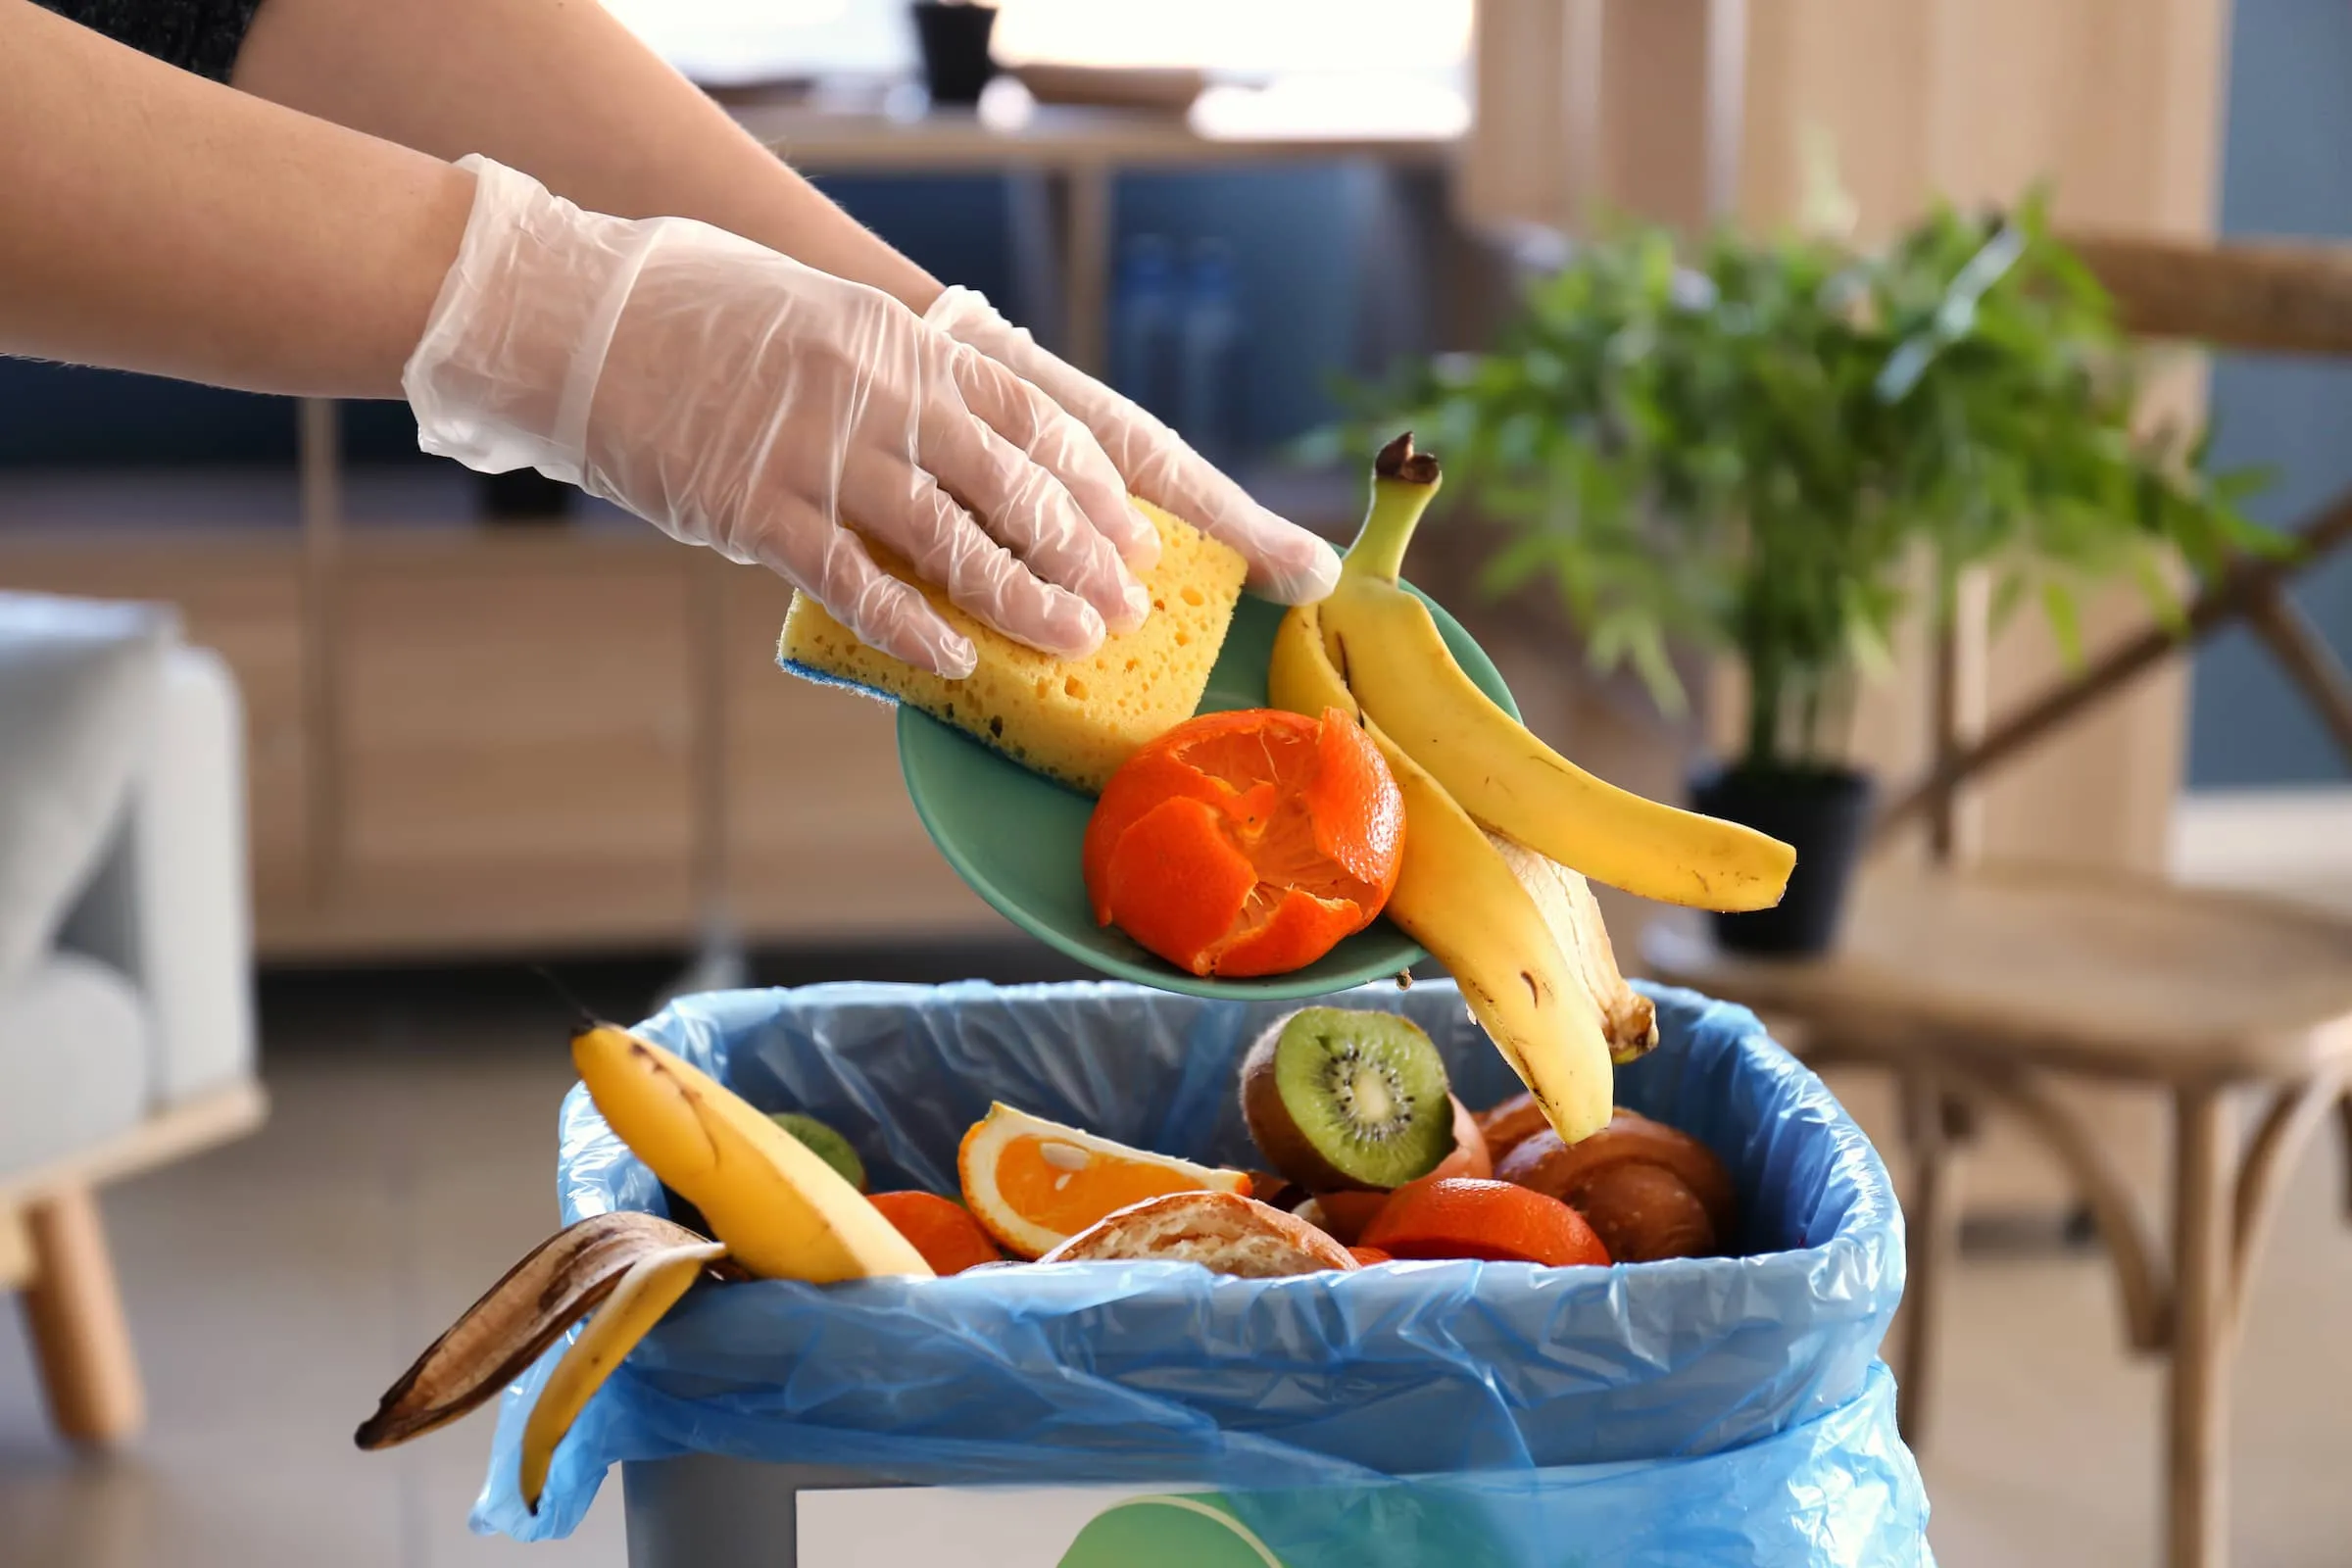
Menu Close

The Hidden Nutrients In The Food We Throw Away

sports woman surrounded by various healthy food lying on the floor

Let’s reclaim those nutrients you’re feeding your food waste bin

Around this time of year, we tend to think a lot about the food on our plates, and the impact this has on the planet. Plenty of people are looking for ways to max out on vitamins and nutrients, and just eat right. 

Whether we’re attempting Veganuary or just trying to clean up our diets, there are plenty of folks looking for ways to max-out on vitamins and stock up on nutrients. 

Even in the depths of winter, there’s plenty of seasonal veg that is widely available, and actually contains a wealth of hidden nutrients many of us are missing out on.

So, which parts of our winter veg are especially good for us to eat? What surprising ingredients should we never throw in the bin, and how do we go about preparing and cooking them?

Ellie Bain, Gousto’s Registered Dietician, has helped us break down what’s in season right now…

Winter hero #1 – Carrots

Carrots are a golden goodie for nutrients. Boiled carrots are a little unadventurous and vitamins are actually lost into the water in the process; opt for steaming or roasting instead.

Carrot tops hold a lot of Vitamin C, along with some calcium and iron. As Vitamin C helps us to absorb iron from plants, carrots tops are a great way to make sure you are getting enough iron in your diet, especially if you are plant-based.

Instead of chopping off the tops, why not try blending them with olive oil, garlic, lemon juice and pine nuts to make a zingy pesto? This is a great hack to minimise food waste, boost the health benefits and add an extra tasty edge to a simple pasta dish.

Alternatively, you could try adding tops to a smoothie, as a great way to get Vitamin C and K in without having to subject yourself to a green spinach smoothie – you’re welcome!

Save yourself some time, there’s no need to peel your carrots, as the peels hold nutritional value too. Simply rinse and scrub until clean, then prepare as usual.

Here’s Gousto’s top 3 ways to prepare them….

Screenshot 2022-01-28 at 12.33.46.png
© Gousto

How to store

You can freeze carrots for up to 12 months. If they feel a little limp, simply submerge them in water for 5 minutes and they’ll quickly become crunchy again.

If you’re keen to give this a try in your own online food order,  read on. At Gousto, we’re always keen to provide diners with plenty of inspiration. We all love a new and inspiring dinner recipe.

A great way to blend up every part of the carrot is to make Gousto’s incredibly moreish ‘Carrot & Bean Patties with Sesame Sauce ’.

Another way to use up carrots is to grate them into a punchy pickle and serve with Gousto’s ‘meat-free mince bulgogi & rice’. 

Or, if you’re looking for something sweet, try making a ‘blood orange & carrot sorbet’. The natural sweetness of the carrot makes them an ideal base ingredient. 

Winter hero #2 – Brussels Sprouts

At Gousto, Brussels sprouts aren’t just for Christmas. These nutritional powerhouses have heaps of Vitamin C that is great for maintaining healthy skin, blood vessels, bones and cartilage.

Not to mention they are incredibly high in fibre, which helps to support the digestive system. Half a cup of cooked Brussels sprouts contains 2 grams of fibre – that’s 8% of your daily fibre needs.

They’re also rich in iron and potassium, which is great for carrying oxygen around the body and your heart function.

For a fun new way to serve,par-boil your sprouts, squash and roast them to reveal their crispy side – perfect for dipping!

And if you’re lucky enough to buy them on the chunky (and very tasty) stalk, don’t throw it away as it can it be eaten in many ways, plus it’s packed full of vitamins

The stalk also provides a bank of nutrients for the sprouts to draw from, helping them stay fresher for longer. Win-win!

© Gousto

How to store

The best way to store sprouts is unwashed, with the stalk still on. However, a lot of the time we don’t see Brussels sprouts with stalks.

If loose, store them in a Tupperware container with some paper towels. They’ll keep for at least one week, if not a little longer. If you blanch them, they’ll last in the freezer for a good 12 months.

If you’re in the mood for some nutritious goodness, have a go at this fibre-rich winter warmer ‘honey-roasted winter veg & herby chicken’ recipe.

Or, if you’re wanting to break away from traditional roast flavours, why not use up your sprouts in this ‘brussels sprout & garam masala tart’?

Experiment with mashing sprouts in this ‘pork belly, sprout mash & spiced red cabbage’, perfect for if you’ve always wanted to learn how to cook a pork belly perfectly. 

Winter Hero #3 – Apples

A healthy snack and natural sweetener for a savoury dish. The health benefits of apples include Vitamin E for your skin and eyes, Vitamin B1 and B2 to help keep your nervous system healthy and Vitamin C for your immune system.

Remember to keep the skins on your apples, as this holds a lot of an apple’s vitamins and antioxidants. It contains Pectin, a type of fibre that acts as a prebiotic for good gut health and helps to lower cholesterol. 

Why not try mixing things up and using them in some savoury meals, too? They add a crunch to salads and a sweet bite to casseroles and pies.

If you have too many, an easy way to revive your apples is by cutting them into chunks and then soaking in cold apple cider or juice for approximately 30 minutes. Place them in the refrigerator while soaking, then your juiciest apples are back!

© Gousto

How to store

Apples can be kept frozen for 3-6 months. The best place to store them is in the fridge, specifically in the salad drawer.

That is unless you’re planning to eat them within 2-3 days, in which case you can keep them out on the kitchen counter or in a fruit bowl.

An unusual, but delicious way to use up apples is in a warming, savoury ‘oven-baked normandy chicken & apple casserole’, served up with green beans and crusty ciabatta to mop up the delicious sauce.

A lighter option could be this classic Austrian dish of ‘chicken schnitzel, apple and potato salad’.

Combining sweet with savoury is a treat for the tastebuds – try adding shredded or sliced apple to a salsa, as part of Gousto’s ‘mexican-style pork chilli with apple salsa’ recipe. A stand-out dish, every time. 

Recipes that hero carrots

Carrot & Bean Patties With Sesame Sauce

Ingredients (for 2 people)

  • 3 spring onions
  • 50g lamb’s lettuce
  • 1 lemon
  • 25g agave nectar
  • 75g bulgur wheat
  • 2 tsp ground cumin
  • 15ml soy sauce
  • 10g coriander
  • 1/2 cucumber
  • 1 can of cannellini beans
  • 2 carrots
  • 30g panko breadcrumbs
  • 2 tbsp tahini
  • 10g toasted sesame seeds

Method

Step 1

Boil a kettle

Add the bulgur wheat to a pot with plenty of boiled water and a pinch of salt (the same as you would for pasta) and cook over high heat for 10-15 min or until tender with a slight bite

Once done, drain and return to the pot and set aside until serving

Step 2

Top, tail, peel (or for a no-waste way, leave the skins on) and grate the carrots finely

Meanwhile, trim, then slice the spring onions finely

Zest the lemon

Step 3

Chop the coriander finely, including the stalks (keep the chopped leaves and stalks separate!)

Step 4

Drain and rinse the cannellini beans and add them to a bowl

Mash the cannellini beans with a masher until smooth

Step 5

Add the grated carrot, lemon zest, ground cumin, sliced spring onion, chopped coriander stalks, sesame seeds and panko breadcrumbs to the bowl of mashed cannellini beans

Add the juice of 1/2 lemon, 1/2 tsp salt and a pinch of pepper and give everything a really good mix up (clean hands is the best way!)

Divide the mixture into 6 patties

Step 6

Heat a large, wide-based pan (preferably non-stick) with a drizzle of olive oil over a medium heat

Once hot, add the patties and cook for 3 min on each side or until golden

Step 7

Slice the cucumber into discs

Meanwhile, combine the tahini, soy sauce, agave nectar and the juice of the remaining lemon with 60ml cold water

Give everything a good mix up – this is your sesame sauce

Tip: add a splash more water if your sauce is looking a little thick

Divide the bulgur between two plates, add the lamb’s lettuce, cucumber and chopped coriander leaves

Drizzle with some olive oil and season with a pinch of salt and pepper

Top with the patties and drizzle over the sesame sauce

Meat-Free Mince Bulgogi With Rice And Spicy Carrot Pickle

Ingredients (for 2 people)

  • 200g Meatless Farm mince
  • 300g steamed white basmati rice
  • 15g ginger & garlic paste
  • 1 carrot
  • 8ml sriracha hot chilli sauce
  • 5g toasted sesame seeds
  • 15ml rice vinegar
  • 15ml tamari soy sauce
  • 15ml toasted sesame oil
  • 80g baby leaf spinach
  • 25g chilli jam

Method

Step 1

Before you begin…

Get all your ingredients and equipment ready

Skim through these steps, then wash your fruit and veg

Note: Equipment and pan sizes vary. Make sure you cook food thoroughly (even if it takes you a little longer than 10 min)

Step 2

Now, let’s get started!

Boil a full kettle

Heat a large, wide-based pan (preferably non-stick) with 1 tbsp vegetable oil over a high heat

Once hot, add the meat-free mince to the pan and cook for 4-5 min or until starting to brown, breaking it up with a wooden spoon as you go

Step 3

Whilst the meat-free mince is browning, top, tail, peel and grate the carrot

Combine the sriracha and rice vinegar in a bowl with a pinch of sugar and 1 tbsp water

Add the grated carrot, then give it a good mix up and set aside – this is your spicy carrot pickle

Step 4

Squeeze the pouch of steamed white basmati rice to separate the grains

Tear the top corner of the pouch[es] (just a little!) and microwave for 2 min or until piping hot

Tip: If you’re cooking two pouches, pop them in together but increase the microwave cook time accordingly

Step 5

Meanwhile, add the spinach to a colander and pour boiled water all over it so that it starts to wilt

Rinse the wilted spinach under cold running water until it’s cool

Once the spinach is cool, squeeze as much water out of it as you can, then add it to a bowl with half of the toasted sesame oil (you’ll use the rest later!) – this is your sesame spinach

Step 6

Once the meat-free mince has browned, add the ginger & garlic paste and cook for 1 min

Add the chilli jam, tamari soy sauce and remaining sesame oil and give it a good mix up – this is your meat-free mince bulgogi

Step 7

Drain the spicy carrot pickle, discarding the pickling liquid

Serve the meat-free mince bulgogi over the warmed basmati rice with the sesame spinach and spicy carrot pickle to the side

Garnish with the toasted sesame seeds

Enjoy!

Blood Orange & Carrot Sorbet Recipe

Ingredients (for 3-4 people)

  • 500g carrots
  • 175g caster sugar
  • 275ml water
  • Juice and zest of 1 lemon
  • Juice and zest of 1 blood orange
  • Pinch of salt

Method

Step 1

Scrub carrots well, cut ends and discard. Grate very finely and set aside.

Step 2

Zest and then juice both citrus fruit.

Add the water and caster sugar to a medium saucepan over medium heat, stirring constantly until sugar is dissolved.

Step 3

Bring to a gentle simmer then add the grated carrots. Bring back to the bubble and continue to simmer for 2 minutes.

Remove from the heat; add the citrus juices and zests along with a pinch of salt.

Step 4

Puree until very smooth (about 3 minutes in total) in a blender on the highest setting, wiping down sides as needed.

Place a sieve over a medium-sized bowl and pass the liquid through the sieve, squeezing through as much juice as possible with the back of a large spoon or spatula (a tip: reserve the remaining puree for baking into muffins, cakes or pancakes).

Step 5

Refrigerate the syrup until well-chilled, then churn in an ice cream machine then freeze (alternatively, pour into a metal bowl and freeze, stirring vigorously every 30 minutes or so to break up the ice crystals).

Freeze completely, then serve and enjoy!

Recipes that hero brussels sprouts

Honey Roasted Winter Veg & Herby Chicken

Ingredients (for 2 people)

  • 2 x 125g British chicken breast fillets
  • 100g Brussels sprouts
  • 15g of flaked almonds
  • 5g of Dijon mustard
  • 1 lemon
  • 1 red onion
  • 25g of honey
  • 15ml of cider vinegar
  • 1 tsp dried oregano
  • 320g butternut squash cubes
  • 130g quinoa

Method

Step 1

Preheat the oven to 220°C/ 200°C (fan)/ 425°F/ Gas 7

Cut the Brussels sprouts in half

Peel and chop the red onion into wedges

Step 2

Line a tray with tin foil and add the halved sprouts, red onion wedges and butternut squash cubes

Drizzle with olive oil and a pinch of salt and pepper and give it a good mix up

Put the tray in the oven for an initial 10 min

Step 3

Meanwhile, heat a dry, medium-sized pot (with a matching lid) over a high heat

Once hot, add the flaked almonds and cook for 2-3 min or until toasted and golden

Tip: Watch them like a hawk so you don’t burn them!

Transfer the toasted almonds to a plate and reserve the pot

Step 4

Rinse the quinoa in a sieve under cold running water

Add the quinoa to the reserved pot with 250ml cold water and bring to the boil over a high heat

Once boiling, reduce the heat to low and cook, covered, for 18-20 min or until all the water has absorbed and the quinoa is tender

Once cooked, remove from the heat and leave to steam-dry, uncovered, until serving

Step 5

Combine the juice of 1/2 lemon and the oregano with 1/2 tbsp olive oil and a pinch of salt and pepper on a plate

Add the chicken breasts and toss until coated

Add the coated chicken breasts to the tray, cover the roasting vegetables and drizzle over the remaining lemon and herb marinade

Return the tray to the oven for a further 10 min

Step 6

Whilst everything is cooking, combine the Dijon mustard with the juice of the remaining lemon, cider vinegar, honey, 2 tbsp olive oil and a pinch of salt and pepper – this is your honey mustard dressing

Step 7

Once the chicken has been cooking for 10 minutes, drizzle the honey mustard dressing over everything and return the tray to the oven for a further 5-10 min or until everything is cooked and tender (no pink meat!)

Slice the herby chicken finely

Serve the roasted vegetables over the cooked quinoa and top with the sliced chicken

Drizzle over all the remaining dressing and juices from the tin foil then garnish with the flaked almonds

Enjoy!

Brussels Sprout & Garam Masala Tart

Ingredients

  • 200g Brussels sprouts
  • 160g puff pastry
  • 20g mango chutney
  • 50g lamb’s lettuce
  • 300g waxy potatoes
  • 1 brown onion
  • 2 garlic cloves
  • 40g cheddar cheese
  • 5g coriander
  • 1 tsp ground turmeric
  • 1 tsp garam masala
  • 1 tsp nigella seeds
  • 1 red chilli

Method

Step 1

Preheat the oven to 200°C/ 180°C (fan)/ gas 6

Boil a full kettle

Add the waxy potatoes to a pot of plenty of boiled water with a pinch of salt and bring to the boil over a high heat

Once boiling, cook for 12-15 min or until fork-tender, then drain and allow to steam

Step 2

While the potatoes are boiling, peel and finely dice the brown onion

Peel and finely chop (or grate) the garlic

Cut the red chilli in half lengthways, deseed (scrape the seeds out with a teaspoon) and chop finely

Step 3

Heat a large, wide-based pan (preferably non-stick) with a drizzle of olive oil over a medium-high heat

Once hot, add the diced onion, chopped garlic, and half the chopped chilli (can’t handle the heat? Go easy!) with a pinch of salt and cook for 5-6 min or until softened

Step 4

Meanwhile, trim the ends from the Brussels sprouts, then finely slice

Once the onion has softened, add the ground turmeric, garam masala and a splash of water and cook for 1 min

Add the sliced Brussels sprouts to the pan with a knob of butter and cook for 7-8 min further or until softened

Step 5

While the sprouts are softening, grate the cheddar cheese and chop the coriander finely, including the stalks

Once softened, add the mango chutney, grated cheese and half the chopped coriander (save the rest for garnish!)

Season with a pinch of salt and a crack of black pepper and give everything a good mix up – this is your Brussels sprout & garam masala tart filling

Step 6

Dust your work surface with a generous sprinkling of flour

Unwrap the puff pastry and roll it out to approx. 0.5cm thickness with a rolling pin and cut into 2 squares

Transfer the pastry squares to a baking tray lined with non-stick baking paper and score a 1cm border around the edge of the pastry with a knife

Top the centre of pastry squares with the Brussels sprout & garam masala tart filling

Step 7

Add the drained potatoes to a baking tray and crush gently

Add a drizzle of olive oil, the nigella seeds and a generous pinch of salt – these are your nigella smashed potatoes

Put the Brussels sprout & garam masala tarts and nigella smashed potatoes in the oven for 15-20 min or until caramelised and golden

Wash the lamb’s lettuce, then pat it dry with kitchen paper

Serve the Brussels sprout & garam masala tart with the nigella smashed potatoes and lamb’s lettuce to the side

Add a drizzle of olive oil and a grind of pepper to the lamb’s lettuce

Top the tart with the remaining chopped coriander and chopped chilli (not a fan of spice? Just add a little!)

Enjoy!

Pork Belly, Sprout Mash & Spiced Red Cabbage

Ingredients (for 2 people)

  • 250g baby red cabbage
  • 1 star anise
  • 30g sultanas
  • 1 x 300g British pork belly
  • 30ml balsamic vinegar
  • 20g spiced plum chutney
  • 5g beef stock mix
  • 3 white potatoes
  • 100g Brussels sprouts

Method

Step 1

Preheat the oven to 200°C/ 180°C (fan)/ 400°F/ Gas 6

Score the fatty side of the pork belly in a criss-cross pattern by drawing a sharp knife through the skin, then season with a pinch of salt

Heat a large, wide-based pan (preferably non-stick) over a medium heat and once very hot, add the pork belly, fat-side down and cook for 3-5 min or until nicely coloured

Step 2

Transfer the pork belly, fat-side up, to a baking tray (use tin foil to avoid mess!) and save the pan (and juices) for later

Put the tray in the oven for 40-45 min, or until it’s crisp on the outside and cooked through

Once done, leave the pork to rest

Step 3

Meanwhile, boil a kettle

Cut the baby red cabbage in half and slice as finely as you can!

Step 4

Add the sliced cabbage, balsamic vinegar, sultanas, star anise, 1 tsp sugar and a pinch of salt to an oven-proof dish (or casserole dish with a lid) and give everything a good mix up

Cover the dish tightly with tin foil (or a matching lid) and put the dish in the oven for 35-40 min or until the cabbage is cooked

Step 5

Meanwhile, peel the potatoes and cut them into large bite-sized pieces

Cut the Brussels sprouts in half

Add the potatoes and Brussels sprouts to a pot of boiled water with a pinch of salt, bring to the boil over a high heat and cook for 15-20 min or until fork-tender

Meanwhile, dissolve 1/2 [1] beef stock cube in 200ml boiled water

Step 6

Return the pork pan to a medium heat with approx. 1 tbsp of the reserved juice

Once hot, add 2 tsp  flour and stir with a wooden spoon for 1-2 min or until a sandy paste forms – this is your roux

Gradually whisk in the beef stock and cook for 1-2 further or until a smooth gravy remains

Stir in the spiced plum chutney – this is your spiced plum gravy

Step 7

Once the potatoes and sprouts are cooked, drain and return them to the pot

Return the pot to a low heat and add a splash of milk and a large knob of butter

Mash until smooth – this is your sprout mashOnce rested, slice the pork belly as thinly as you can using a sharp knife

Serve the pork belly with the sprout mash and braised red cabbage to the side and spoon over the spiced plum gravy

Enjoy!

Recipes that hero apples

Oven-Baked Normandy Chicken & Apple Casserole

Ingredients (for 2 people)

  • 250g British diced chicken thigh
  • 11g chicken stock mix
  • 2 ciabattas
  • 21g wholegrain mustard
  • 15ml Chinese rice wine
  • 5g chives
  • 50g soft cheese
  • 80g trimmed fine green beans
  • 2 garlic cloves
  • 1 apple
  • 1 brown onion

Method

Step 1

Before you begin…

This recipe takes around 5 min to prep, so get your casserole dish and all your ingredients ready, then wash your fruit and veg

Note: Make sure your dish is oven-proof and safe to use on the hob. Don’t have one? Start cooking in a large, wide-based pan then transfer to an oven-proof dish

Step 2

Now, let’s get started!

Preheat the oven to 220°C/ 200°C (fan)/ gas 7

Boil half a kettle

Heat a large, wide-based, oven-proof casserole dish with a drizzle of olive oil over a medium-high heat

Chop the apple into wedges and remove the core

Step 3

Peel and chop the brown onion into wedges

Step 4

Add the diced chicken thigh to the dish with 1 tsp flour and cook for 30 secs

Crush the garlic cloves open by squashing them with the side of a knife and remove the skins

Step 5

Add the chopped apple and onion wedges with the crushed garlic and give everything a good stir

Add the chicken stock mix and 200ml boiled water

Step 6

Add the Chinese rice wine and stir through with the wholegrain mustard and soft cheese

Bring to the boil over high heat, then put the dish in the oven, uncovered, for 30-35 min or until the chicken is cooked through (no pink meat!) – this is your Normandy chicken & apple casserole

Use this time to clear up, set the table, have a cup of tea or simply chill!

Step 7

Once the casserole is almost done, add the green beans to one side of a baking tray with a drizzle of olive oil and a pinch of salt (use tin foil to avoid mess!)

Add the ciabattas to the other side of the tray

Tip: Cooking for 4? Use 2 trays!

Put the tray in the oven for 5-7 min or until the beans are tender but retaining a bite and the ciabattas are warm and crusty to serve, chop the chives and sprinkle them all over the Normandy chicken & apple casserole then season with pepper

Serve the crunchy beans and crusty ciabattas to the side

Tip: For extra indulgence spread the ciabattas with butter before dipping

Let everyone dig in!

Chicken Schnitzel, Apple & Potato Salad

Ingredients (for 2 people)

  • 3 mayonnaise sachets (45ml)
  • 5g chives
  • 1 seasonal British apple
  • 20g horseradish cream
  • 1 spring onion
  • 1 British free-range egg
  • 1 lemon
  • 1 large British chicken breast fillet
  • 300g waxy potatoes
  • 30g panko breadcrumbs

Method

Step 1

Boil a kettle

Meanwhile, cut the waxy potatoes (skins on) into large, bite-sized pieces

Add the potatoes to a pot of boiled water with a pinch of salt, bring to the boil over high heat and cook for 15-20 min or until they’re fork-tender

Step 2

Meanwhile, place your hand flat onto the chicken breast

Slice in half as if you were cutting a burger bun, so you are left with two thinner pieces of chicken

Step 3

Add a handful of flour to a plate with a generous pinch of salt and pepper

Crack the egg into a shallow bowl and beat with a fork

Add the panko breadcrumbs to a plate with a pinch of salt and pepper

Coat the sliced chicken in the flour, tap off the excess, then into the beaten egg and finally press it into the panko breadcrumbs firmly to coat everything evenly

Step 4

Add the mayonnaise to a large mixing bowl with the horseradish cream, the juice of 1/2 lemon, and a generous pinch of salt, pepper and sugar

Add a generous drizzle of olive oil and mix to combine – this is your lemony horseradish dressing

Step 5

Trim, then finely slice the spring onion

Chop the chives finely

Dice the apple (skin on)

Add the sliced spring onion, chopped chives and diced apple to the bowl of horseradish dressing and set aside

Step 6

Heat a large, wide-based pan (preferably non-stick) with a very generous drizzle of vegetable oil over a medium-high heat

Once hot, add the breaded chicken and cook for 4-5 min on each side until golden

Tip: Add more oil if your pan is looking a little dry

Once cooked, transfer to kitchen paper (keep the pan!) – these are your chicken schnitzel

Step 7

Return the pan to high heat and cut the remaining lemon into wedges

Once the pan is hot, add the lemon wedges to the pan and cook for 1 min on each side or until they’re slightly browned – these are your caramelised lemons

Once done, add the drained potatoes to the bowl with the diced apple, spring onion and chopped chives and give everything a gentle mix

Serve the chicken schnitzel over the apple and potato salad

Garnish with the caramelised lemon

Enjoy!

Mexican-Style Pork Chilli With Apple Salsa

Ingredients (for 2 people)

  • 250g British pork mince
  • 11g beef stock mix
  • 40g chipotle paste
  • 130g bulgur wheat
  • 32g tomato paste
  • 30ml red wine vinegar
  • 1 tsp ground allspice
  • 1 red onion
  • 40g cheddar cheese
  • 1 apple

Method

Step 1

Peel and finely dice the red onion

Heat a large, wide-based pan (preferably non-stick) with a drizzle of vegetable oil over a medium-low heat

Once hot, add 3/4 of the diced red onion and a pinch of salt, then cook for 5 min or until softened and starting to caramelise

Step 2

Meanwhile, add the remaining diced red onion to a medium-sized bowl with a pinch of salt and the red wine vinegar and set aside to pickle – this is your quick-pickled red onion

Boil a kettle

Step 3

Stir the ground allspice into the softened onion and cook for 1 min

Add the pork mince and cook for 3-4 min or until beginning to brown, breaking it up with a wooden spoon as you go

Step 4

Add the bulgur wheat to a pot with plenty of boiled water and cook over high heat for 7-9 min or until tender with a slight bite, then drain and return to the pot

While the bulgur wheat is cooking, dissolve the beef stock mix in 350ml boiled water

Step 5

Once the mince has browned, stir in the tomato paste and chipotle paste (can’t handle the heat? Go easy!) and cook for 1 min

Add the beef stock and reduce the heat to medium-low

Cook for 10-15 min or until thick and reduced to a chilli-like consistency – this is your Mexican-style pork chilli

Step 6

While the chilli thickens, finely dice the apple (skin on)

Grate the cheddar cheese

Step 7

Add the diced apple to the quick-pickled red onion with 2 tbsp olive oil and season lightly with salt and pepper – this is your apple salsa

Fluff the cooked bulgur with a fork

Serve the Mexican-style pork chilli over the fluffed bulgur with the apple salsa to the side

Top with the grated cheese

Enjoy!